Before reading this document it may be preferable to read about the routes in general and their parameters: Routing documentation.
This document describes how to use the Blockly editor in order to fulfill custom routing use cases. The advantage of using Blockly is the ease of use for technicians unfamiliar with programming languages. It gives anyone the opportunity to build, export, import custom blocks and use those across different projects / sites.
The first section describes how to get started with the blockly editor.
The second section explains the basics about the blocks.
The third section dvelves into the creation and edition of customs blocks.
The fourth and fifth section are more advanced and require basic skills in the JavaScript programming language.
The fourth section section shows how to use pure Javascript functions for routing.
The fifth section section describes the script block.
¶ 1. Getting started
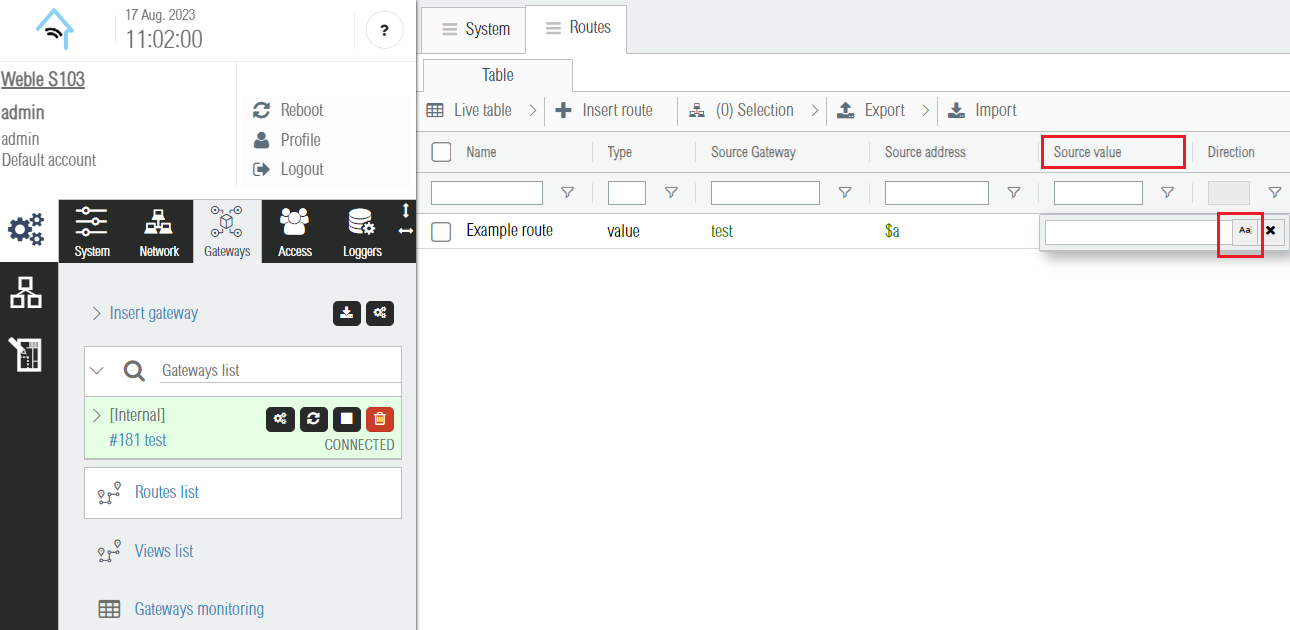
In order to open the editor, you first have to create a route and then edit the "Source value" column. This column is used to modify / apply custom functions to the source value before it gets written to the route destination address.
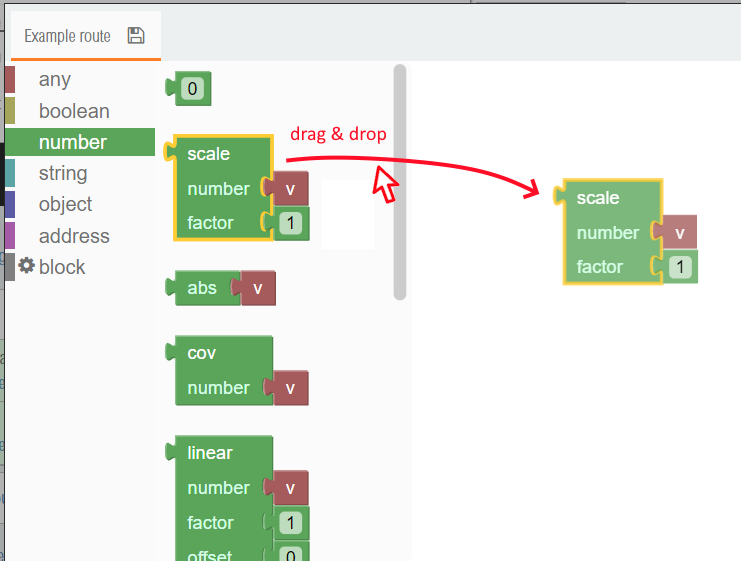
New blocks are inserted from the menu on the left by drag & dropping it in the editing area. In the screenshot below, a scale block is added. This block allows to multiply the routed value and can be used to apply basic unit conversions.
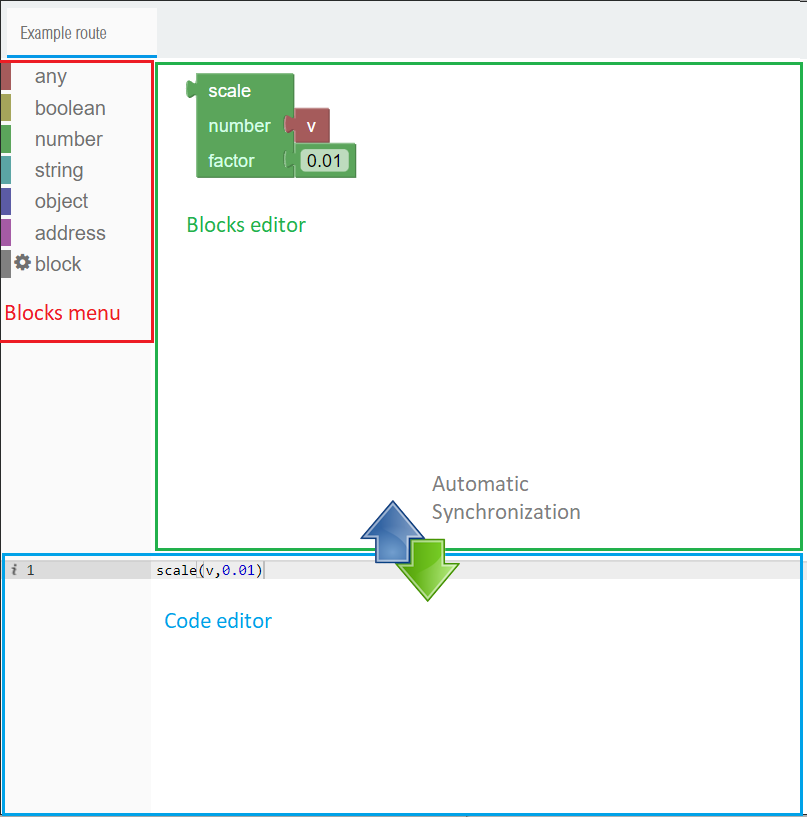
The Blockly editor is divided in 3 main parts, the Blocks menu on the top left, the block editor on the top right, and the code editor on the bottom left.
- The Blocks menu organizes the blocks and lets you drag & drop new blocks into the Block editor window.
- In the Block editor window enables you to move and connect your blocks together.
- Each visual blocks diagram has its JavaScript code representation and can be edited directly in JavaScript from the Code editor window.
The Block editor content and the Code editor content are automatically synchronized to match each other. When one is modified, the other gets updated.
¶ 2. Blocks
Each block has a single output on its left side and has a variable number of inputs (ranging from 0 to n) on its right . The blocks are organized by colours. The block colour is indicative of the block output type. Regarding the inputs, their type is indicated by the colour of the input text label.
¶ 2.1 Input and output types
There is 6 different types possible for outputs and inputs:
- any. This type is can be either boolean, number, string, object, or address. The any type is dynamic and only determined during each block execution.
- boolean. Boolean values are binary: true/false or 1/0.
- number. Numbers can be positive or negative with support for optional decimal numbers. The binary representation of numbers is the one used by JavaScript (the double-precision 64-bit binary format IEEE).
- string. Strings are chain of caracters used to represent litteral text. JavaScript strings are encoded in the UTF-16 format.
- object. Any object, especially objects that can be serialized to the JSON format such as the following example:
{
  "humidity" : {
     "value" : 70,
     "unit"  : "%"
  },
  "temperature" : {
    "value" : 22,
    "unit"  : "°C"
  }
}
- address. An address is a special type of object that represents one of the address in the Weble IoT gateway. It could be a modbus, bacnet, knx, or any other type of address. A route typically has one source address and one destination address. All weble addresses share the same base structure such as the following.
{
  "id"  : 123213, //numerical unique id
  "name" : "%bac:local/outputValue:2/presentValue", //the string identifier
  "gateway_id" : 3, //specifies the gateway driver id
  "value" : 33, //last known value
  "value_string" : "33", //serialized last known value
  "value_date" : 1692272239308, //last known value date time
  "json" : {/* ...  protocol / driver specific ... */},
   /** ... and some other properties ... **/
}
¶ 2.2 Types check
When you connect different blocks together, the blockly editor makes sure that their respective output and input types are matching. As an example, a green block with an output of type number can only be connected to another block's input of type number or any.
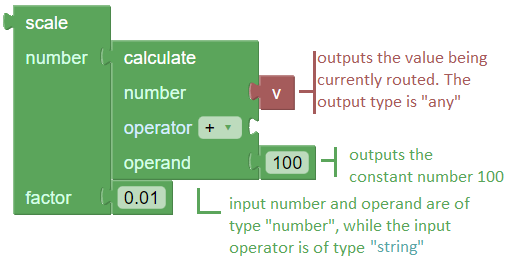
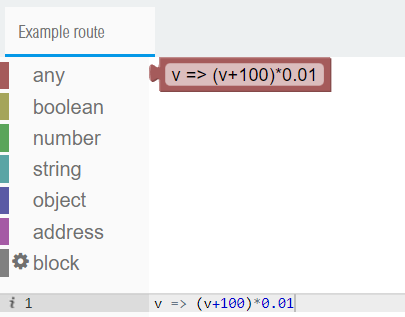
The example above showcases block connections. This block diagram takes the value being routed (the value of the source address), adds 100 to it, and then multiplies the result by 0.01. The final number returned by the scale block is then written on the destination address defined in the route. Note that the same computation can be done with a single JavaScript function block such as below.
¶ 2.3 Blocks documentation
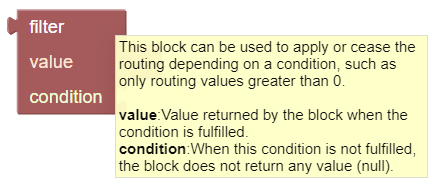
Blocks have tooltip documentation, the text appears by pointing the mouse cursor on the block and keeping the cursor immobile for few seconds.
¶ 3. Custom blocks
This section describes the step by step procedure to create a new custom block. The main advantage of custom blocks is the ability to import/export blocks and use those on different devices / sites / projects.
¶ 3.1 Custom block creation
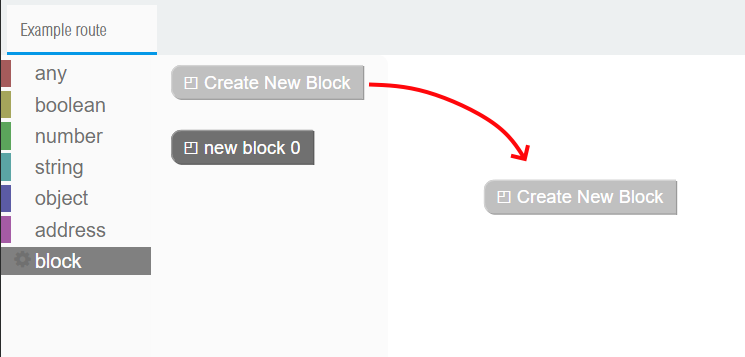
The new block is created by drag & dropping the Create New Block block. Once created, the new block is automatically renamed to new_block_#.
¶ 3.2 Custom block edition
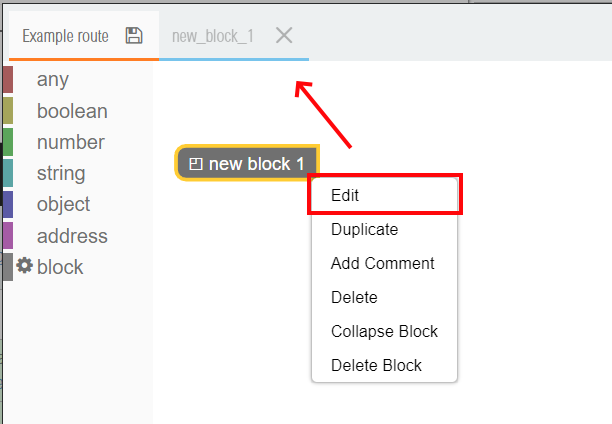
A custom block can be edited either by double clicking on it or using the right click context menu as shown below. After clicking Edit, a new tab with the name of the custom block is added and openened.
¶ 3.3 Renaming custom blocks
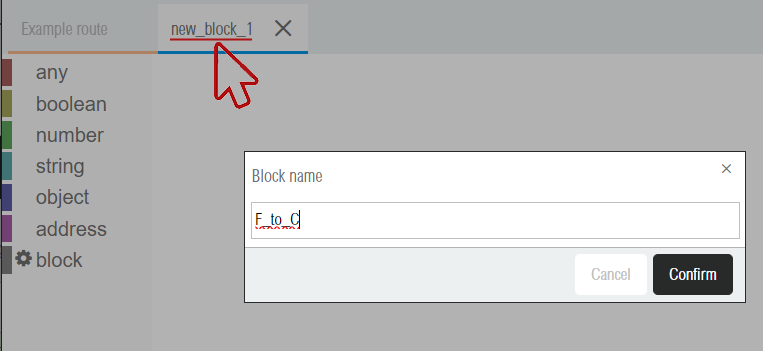
When the tab title of the block is clicked, a popup windows opens. From that window, the block can be renamed. Here it is named F_to_C as it will be used to demonstrate a temperature unit conversion from Fahrenheit degrees to Celsius degrees.
¶ 3.4 Editing custom blocks
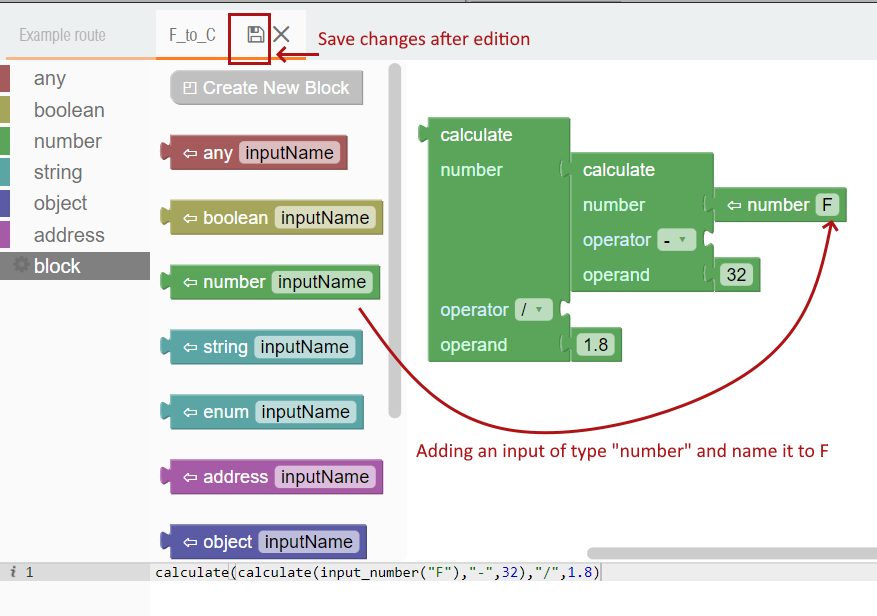
The edition of custom blocks is follows the same principle as seen before. You can drag & drop blocks from the left menu and combine those together. In the example below, the block calculate is used to substract by 32 and then divide by 1.8 for the unit conversion. Custom blocks have special blocks to define their inputs. Custom blocks can have any number of inputs. Here the block has one input of type input, named F for Fahrenheits. Once saved with the save button on the tab title, the custom block can be used in the routing function diagram (here Example route).
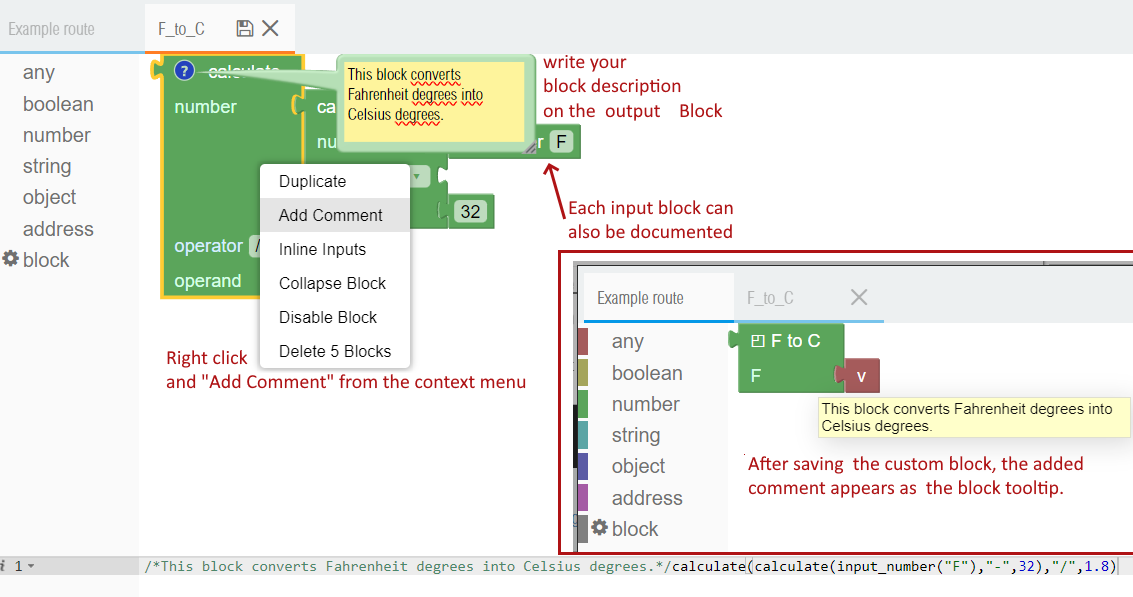
Customs block can be documented by adding a comment to its output block (first block on the top left). To do so, right click on the block and then select Add Comment. Once saved, the comment is shown as a block tooltip documentation for the technicians / users.
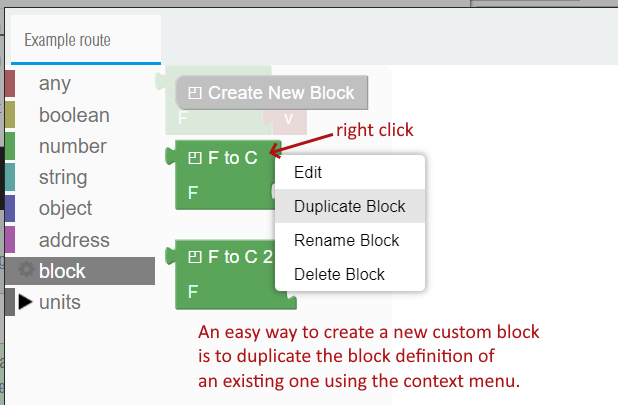
Custom blocks can be duplicated using the context menu. It is a convenient way to create a new custom block without starting it from scratch. This is shown in the screenshot below.
¶ 3.5 Custom blocks categories
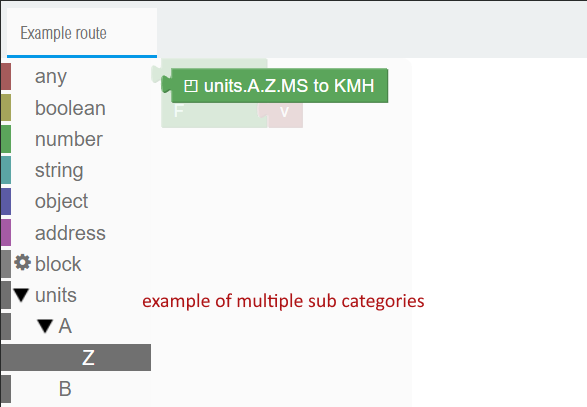
Custom blocks can be organized in a folders / subfolders hierarchy. To do so you can simply rename the block and seperate each hierarchy folder with a dot such as renaming F_to_C into units.F_to_C. There is no hard limit in the number of hierarchical levels but in practice it is better to limit oneself to maximum 1 or 2 dots. The example below shows a 3 level category.
¶ 3.6 Import and export of custom blocks
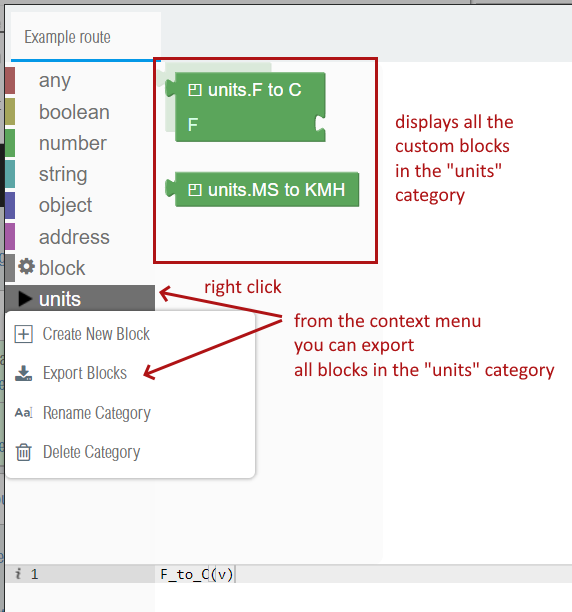
It is easy to import / export blocks from one category, as show in the example below, here the category units has 2 blocks (units.F_to_C and units.MS_to_KMH). The blocks can be exported to a file by right-clicking the given category (here units).
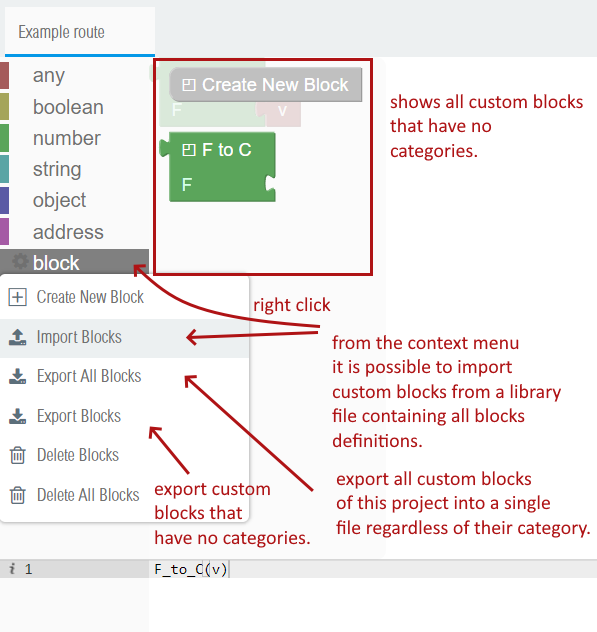
Custom blocks that have no categories appear in the generic block section. In the example below, you can see that there is only one custom block without categories named F_to_C. By right-clicking on the block section, you can import blocks from a file, export all Blocks (independently of their categories or absence of categories), or export solely blocks that have no categories (here the F_to_C block).
Each blocks file is in fact a JavaScript object. Each key of the object is the name of the block and the corresponding value is a function containing the block code. Below is an example of a blocks file (named allBlocks.js) obtained by exporting all Blocks from our device.
{
    "F_to_C" : () => {
        calculate(calculate(input_number("F"),"-",32),"/",1.8)
    },
    "F_to_C_2" : () => {
        calculate(calculate(input_number("F"),"-",32),"/",1.8)
    },
    "units.A.MS_to_KMH" : () => {
        scale(3.6,v)
    },
    "units.A.Z.MS_to_KMH" : () => {
        scale(3.6,v)
    },
    "units.B.MS_to_KMH" : () => {
        scale(3.6,v)
    },
    "units.F_to_C" : () => {
        calculate(calculate(input_number("F"),"-",32),"/",1.8)
    },
    "units.MS_to_KMH" : () => {
        scale(3.6,v)
    }
}
¶ 4. Pure JavaScript function
Programmers can directly write code in JavaScript for their routing functions. In fact each block is a JavaScript function and block diagrams are combinations of JavaScript functions. JavaScript function can be written directly in the code editor and are translated to a constant value block of return type any. This is shown below in a function that converts Fahrenheit degrees to Celsius degrees.
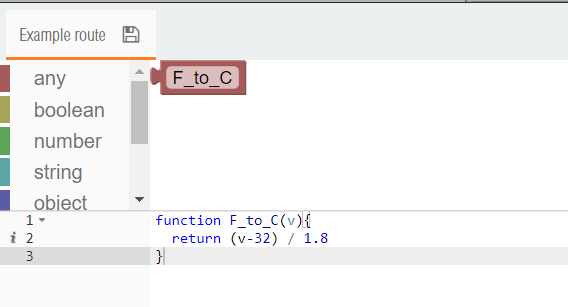
The routing function can take up to 5 arguments described below:
- v. The value being routed. The value type is usually a numerical value, a string, or a JSON object.
- src. Source address object.
- dst. Destination address object.
- info. The info object contains information about the event triggering the route, the route definition, and a context to store variables between executions.
{
    trigger: 'value', /* The trigger of the route execution.
  		Can be either "value", "status", "refresh", "gateway", or "reprod".
      The trigger is "value" when it is a normal route execution triggered
      by a change in the source address value.
      The trigger is "refresh" when the route is first activated or modified.
      The trigger is "gateway" when one of the route gateway restarts.
      The trigger is "reprod" when the route is repeated due to the repeat
      route parameter.
    */
    route:	{ //The route definition
        id: '859692e2-081e-4cfe-bc47-cbcb03d497f0',
        name: 'Example route',
        index: 0,
        type: 'value',
        direction: 'right',
        disableDelay: '',
        repeat: 0,
        minimumDiff: 0,
        buffer: 0,
        active: true,
        source: {
            address: '$a',
            gateway: 'test',
            value: 'function F_to_C(v){\nreturn (v-32) / 1.8\n}'
        },
        destination: {
            address: '$b',
            gateway: 'test'
        }
    },
    context: {
    /*The route context can be used to store custom variables accessible
    at each route execution. This route context is shared between all
    blocks/functions of the route block diagram.*/
  },
    functionContext: {
        functionId: 'due9rfefqvo'
    /*The function context is similar to the route context, but individual
    to each block/function of the route block diagram.*/
    },
    callId: 2  //the call id is incremented each time the function is called.
}
- callback (optional). If the function has an argument named callback, then the function becomes asynchronous (which means the result of the function doesn't need to be returned directly, but can be returned later by calling the callback function). This permits to use JavaScript async functions, such as setTimeout calls for adding a delay, or calls to other APIs. The example below shows a function called temporize which adds a 1 second delay and in case of parallel executions only keeps the last execution.
function temporize(v, src, dst, info, callback){

  var myCallId = info.callId //store the call id in a local variable.
  info.functionContext.lastCallId = myCallId //store it in the functionContext.

  //wait 1000 ms
 setTimeout(function(){
    if(myCallId == info.functionContext.lastCallId){
     		// There is no other parallel executions, return the value to be routed.
            callback(null,v)
    }else{
      // There is another later execution of this block,
      // returns the null value which cancels this execution of the route.
      callback(null,null)
    }
  },1000)

}
It shall be noted for advanced users that the this JavaScript keyword in all routing functions refers to the gateways API object, making it possible to make API calls inside the routing functions like this.getAddress(...), this.readValue(...), this.writeValue(...), etc...
¶ 5. Script block
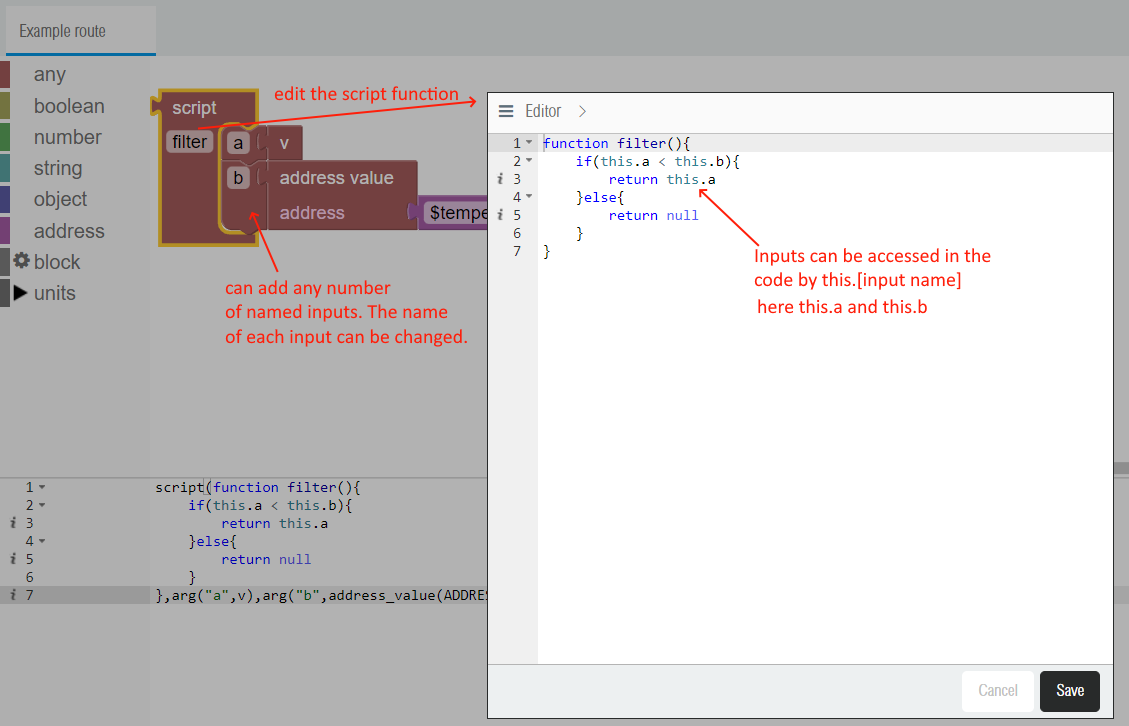
The limitation of using direct JavaScript functions lies on the fact that their corresponding block in the diagram does not have any inputs, making it hard to combine those with other existing blocks. The script block solves this problem by providing any number of named inputs and making those inputs accessible from its code. This permits to use the results of other blocks in our JavaScript code. The script block first and main parameter is its JavaScript function. It can be edited by clicking on its name on the block (in screenshot below the name is filter). Once clicked, it opens the code editor. The function arguments are optional and the same as described in the previous section. Usually the function arguments are not used and left empty, using instead solely the script block named inputs. The named input are accessible from the this keyword and the given input name. It shall also be noted that the gateways API object can be accessed with this.gateways. In the example below, the script block filters out values bigger or equal to the value stored in the $temparture internal address.
