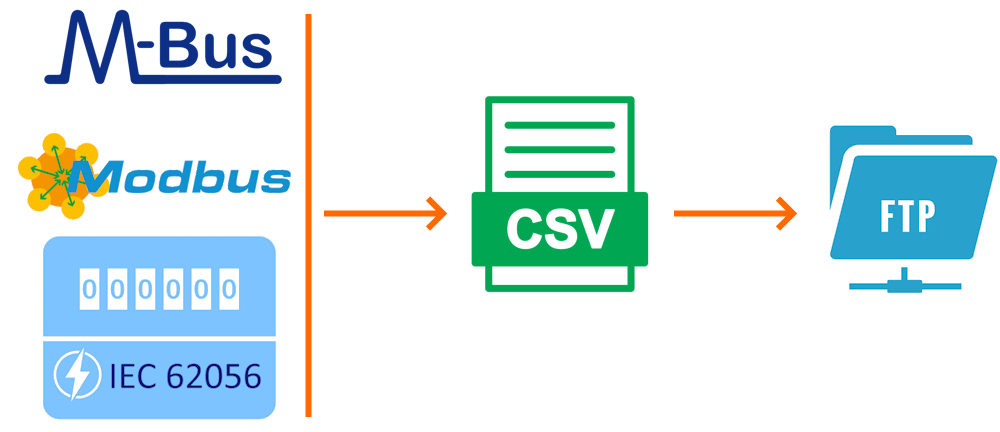
The CSV gateway driver acts as a data logger. It allows the creation and export of CSV files containing data readings (such as data from water and electricity meters). The generated CSV files are stored locally and accessible from external applications through our HTTP API or with a FTP client. CSV files can also be automatically exported to an external storage through our FTP client driver or through our SMTP driver as an attached file in an email.
¶ 1. Getting started
In this step by step tutorial, a CSV gateway is created and populated with M-Bus, and the file sent over by FTP and by email over SMTP as an attached file.
The first step is to insert a gateway of type CSV, and name it CSV demo. The other parameters can be kept to their default values.
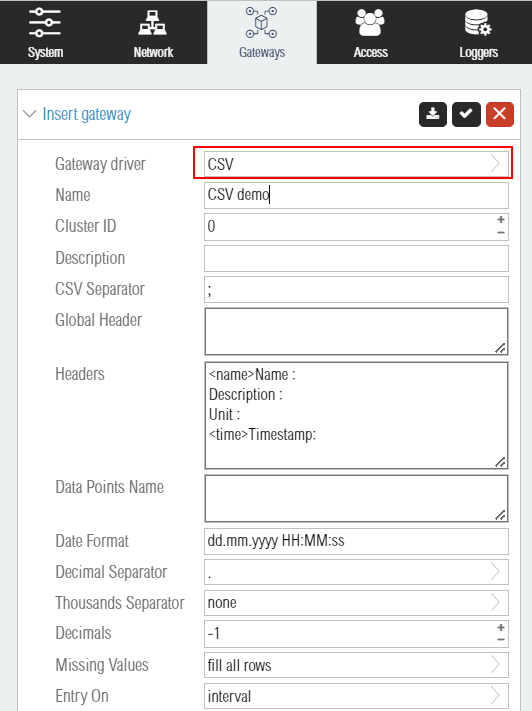
The following sections demonstrate two methods to insert logged csv data points. The first method is manual (section 1.1) and the second is scripted (section 1.2)
¶ 1.1 Manual configuration
To add data points to the CSV gateway, it can be done manually by adding the list of your points name in the Data Points Name. Each data point name must be separated by a new line character. On the screenshot below the points temperature, A, B, C are added. Once the points are added after restarting the gateway, the addresses are automatically added. -
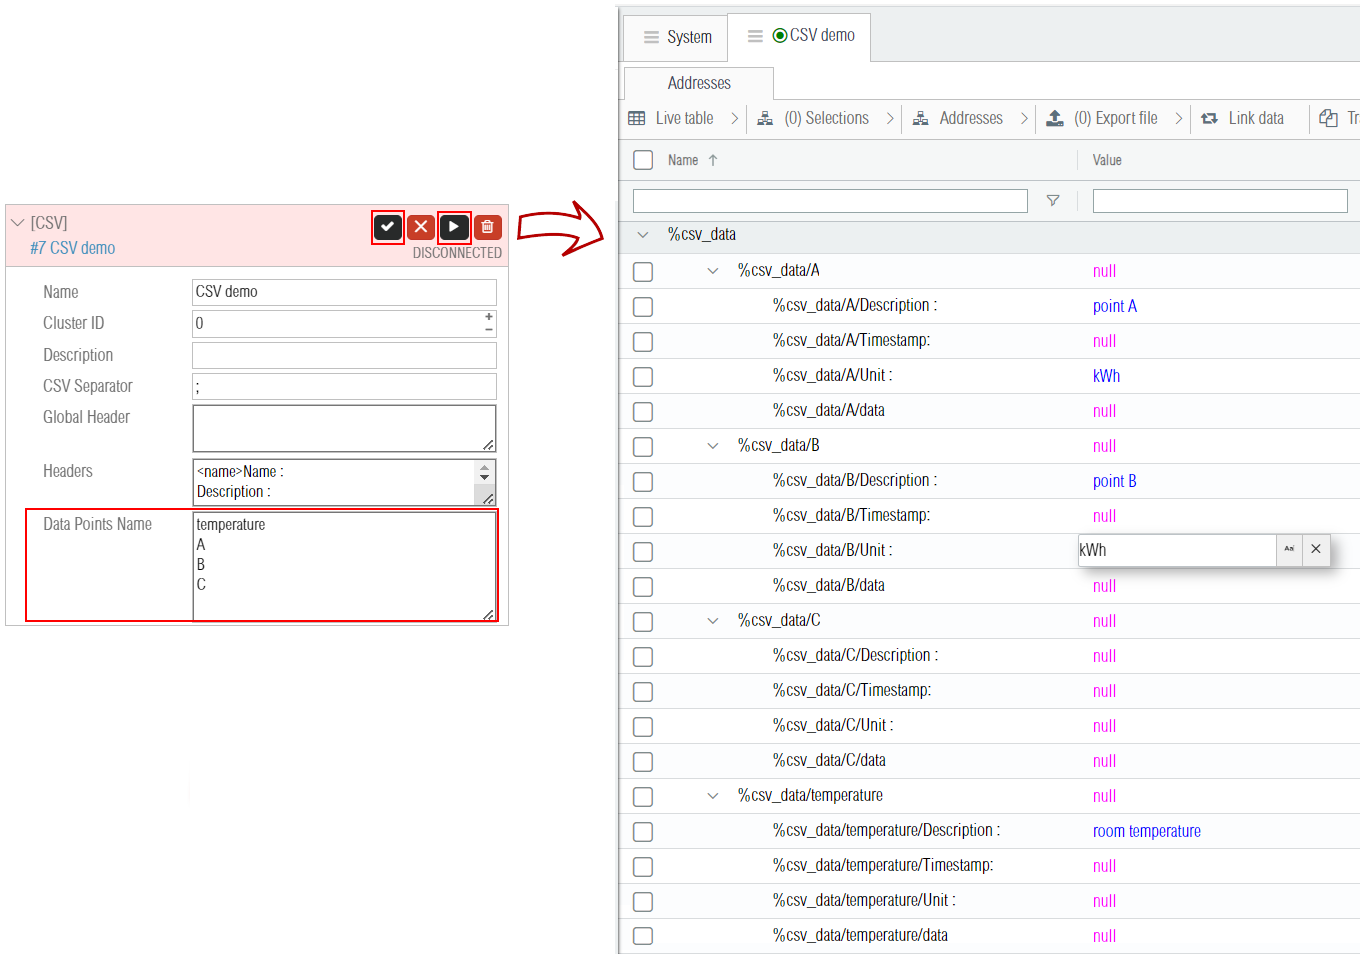
Each of the leaves addresses name ends with its corresponding CSV file header label. There is two main types of headers :
-
The essential CSV headers of type
<time>(entries timestamp) and of type<data>(entries data values). Those are filled automatically by the CSV driver when a new sample value is written on their parent address (%csv_data/A,%csv_data/B,%csv_data/C, and%csv_Data/temperature). -
The optional information CSV headers (here
Description:andUnit:). Those and their corresponding addresses (e.g.%csv_data/A/Description:,%csv_data/A/Unit:,%csv_data/B/Description:,%csv_data/B/Unit:,...) can be filled manually as shown in the screenshot above.
In order to feed data into the CSV driver, it is possible to manually create routes between the data point and its CSV data point name. The screenshot below shows how to map the M-Bus data point %mbus:1/0 into the CSV data point A by drag & dropping the %mbus:1/0 address onto %csv_data/A (which in turn displays the route creation popup).
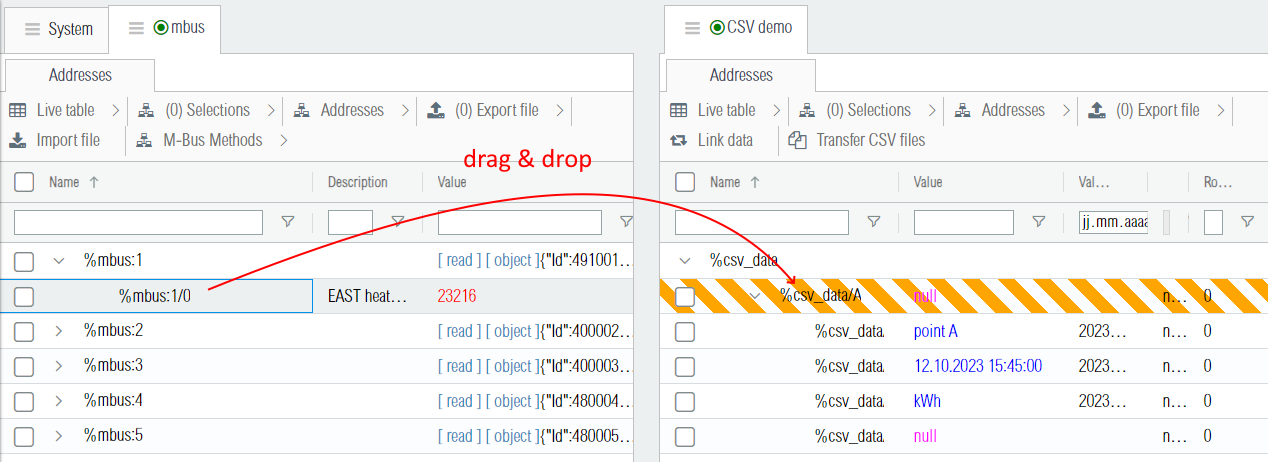
Note that once your manual configuration is completed there should be at least one route for each data point name of the CSV file (unless the data comes from a logic circuit or an external application through the API).
¶ 1.2 Wizard drag & drop (M-bus example)
If there are many data points to log in the CSV files (hundreds or more points), it is tedious to add manually the points one by one. In such cases, it is conveniant to use the drag & drop wizard importation described below (or alternatively if you have programming skills to implement your own importation script using our http API).
¶ 1.2.1 Drag & drop addresses
The first step is to select the addresses to import (parent addresses can be selected too). In this tutorial, we select all M-bus addresses ending with /0, which is the first data entry of each M-Bus meters.
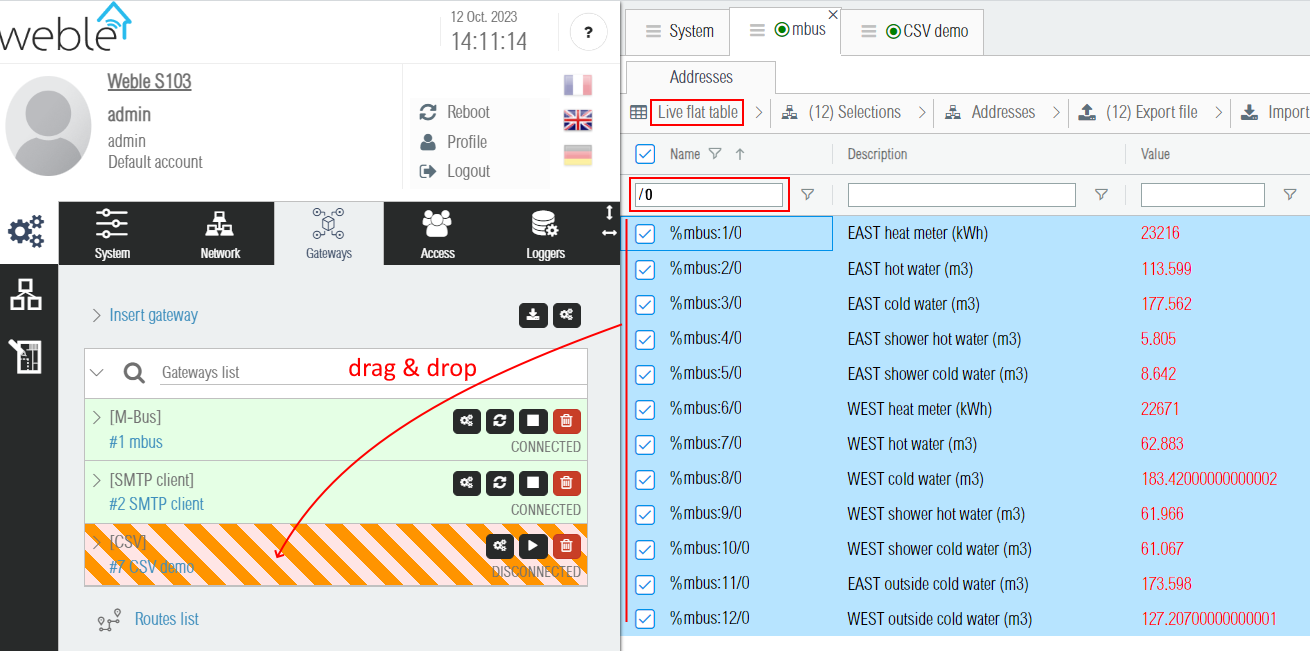
¶ 1.2.2 CSV data points creation popup
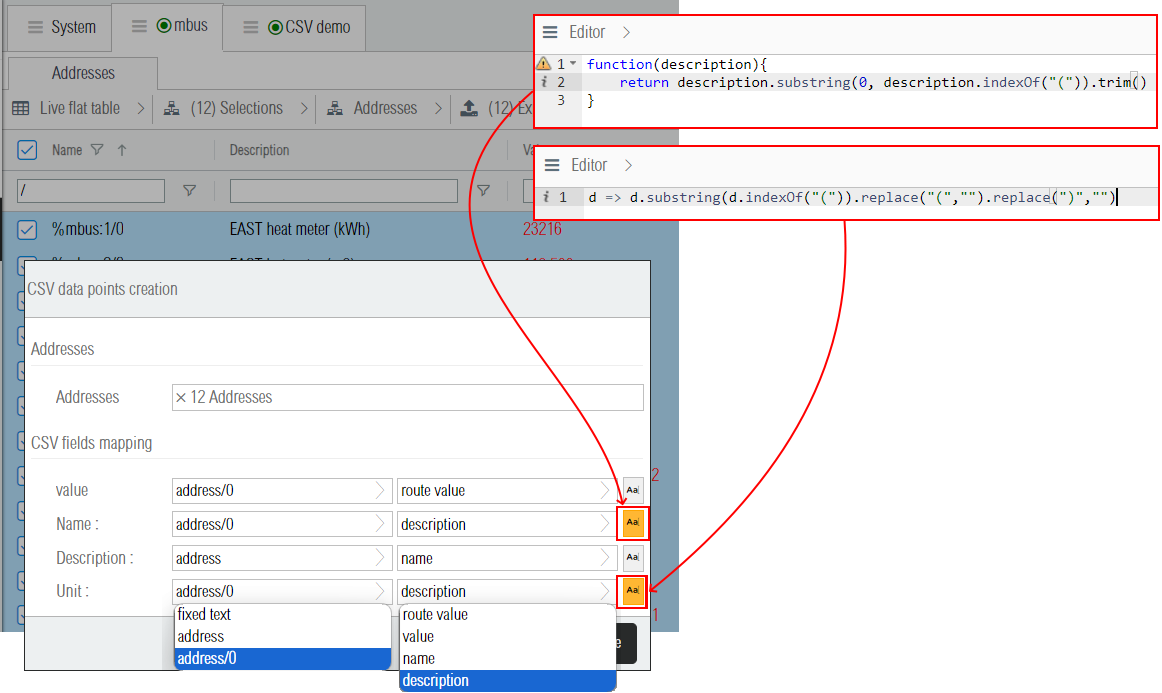
After dropping the addresses the CSV data points creation popup appears. That popup permits to create the mapping between the configured CSV headers and the selected addresses. The addresses are analyzed to detect patterns in their address names (including their parent/children address names). If the addresses are correctly selected, then it is possible to configure the mapping between the CSV fields and the selected addresses. For each CSV header, there is 3 menus:
-
In the first drop down menu, for each of the CSV header it is possible to select the source address as either the main address such as
%mbus:1,%mbus:2,%mbus:3,..., denominated in the popup as the pattern address or its children ending with/0(first value of each M-bus meter) such as%mbus:1/0,%mbus:2/0,%mbus:3/0,..., denominated in the popup by the pattern address/0. Note that it is also possible to select the option fixed text to only fix a constant text value independent from the selected addresses. -
In the second drop down menu, it is possible to chose which property of the selected address to use for the mapping. The options are route value, value, name, and description. The route value option should be used to route the value of the address (here
%mbus:[X]/0) into the CSV header of type<data>. This will create the route feeding the data samples into the CSV driver data points. The value, name, and description options are used to import / write the selected address property into the CSV header (one time import, no routes are created). -
The third button can be used to apply a transformation to the routed or imported value. If the second menu is route value, then the routing function editor is used. On the other hand for the one-time import of the selected address property (value, name, or description), a raw JavaScript code editor is used. In the figure below, simple functions are configured in order to extract the data point name and its measurement unit from its corresponding MBus address description (such as
"EAST heat meter (kWh)").
¶ 1.2.3 Results of the mapping
After clicking the confirmation button of the CSV data points creation creation popup, a popup appears with the results of the operation containing the 3 following informations :
- The number of CSV data points inserted
- The number of CSV headers updated (one-time import)
- The number of routes updated or inserted (route value option)
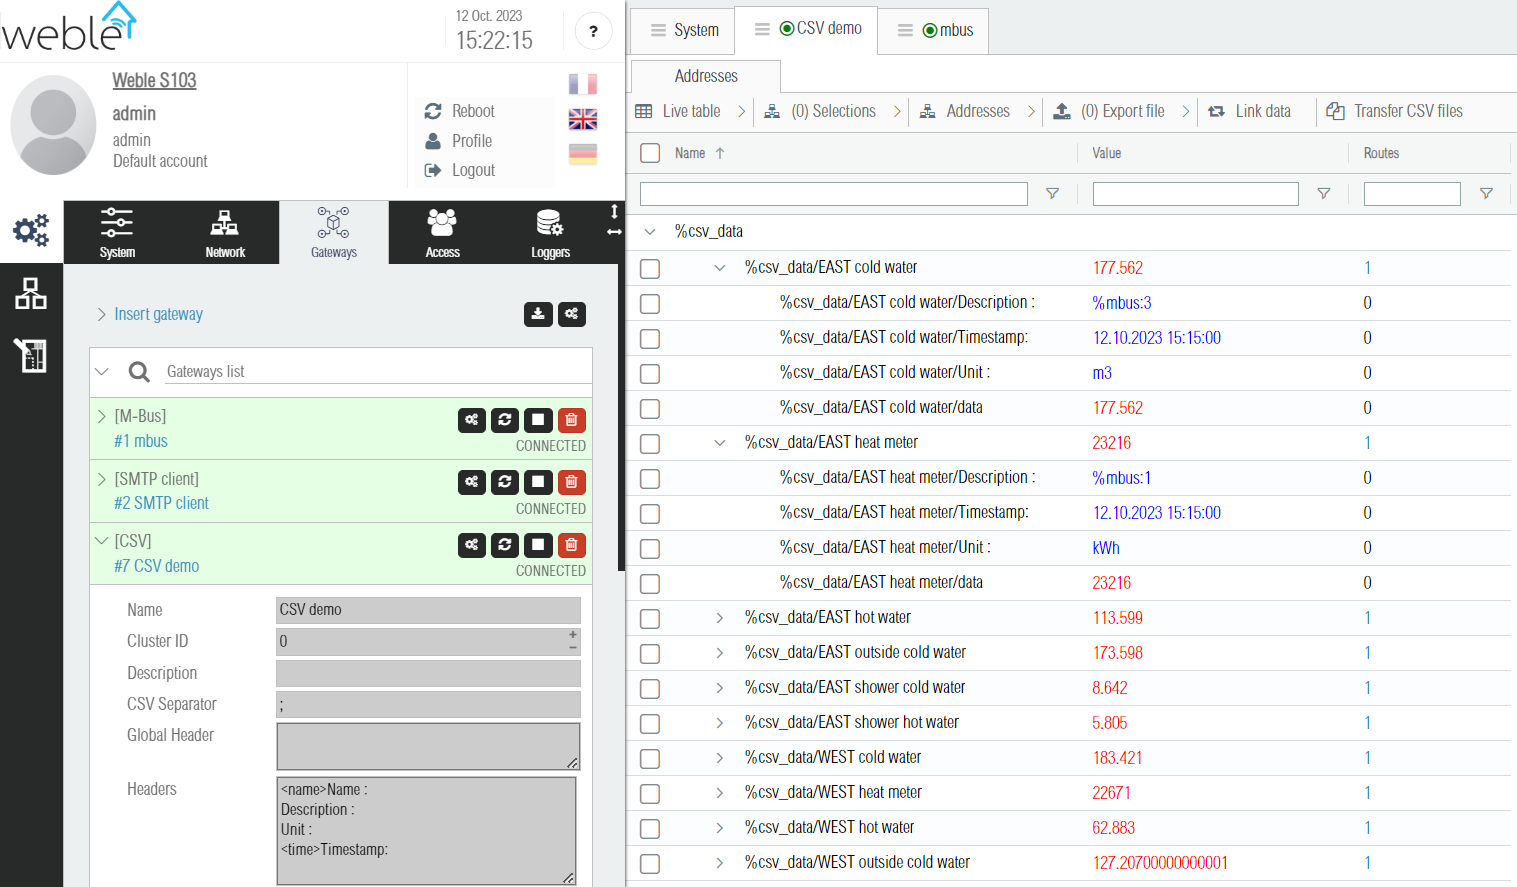
After completion, it is possible to check the results. As you can see on the screenshot below, the CSV data points where created using for their names the M-Bus address description (with the unit information stripped out). In the Description header there is the address name of the MBus meter (such as %mbus:3, %mbus:1). In the Unit header, there is the extracted unit from the MBus description (such as m3 or kWh). Also in the Routes column, it can be seen that one route was created for each data point.
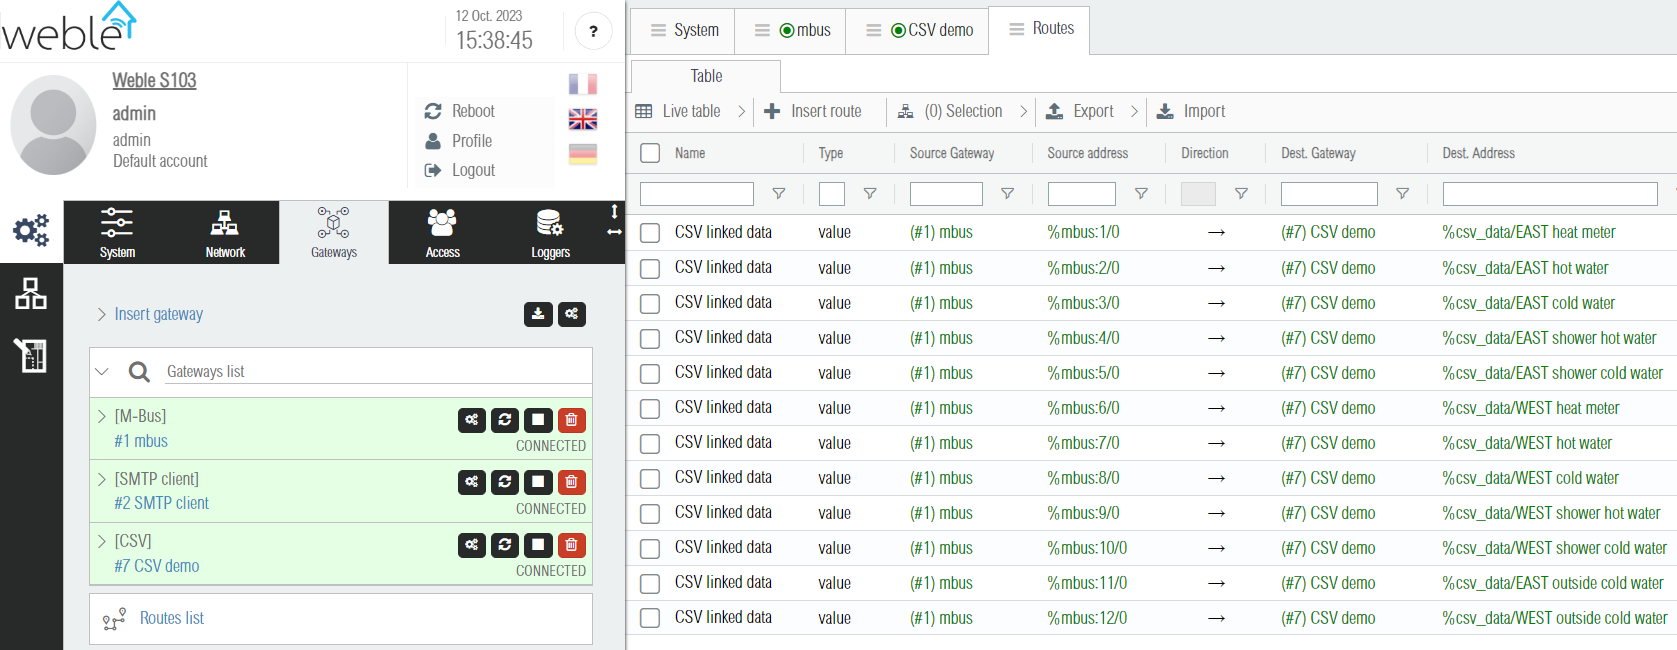
The routes generated by the wizard are visible in the Routes table. Their name is CSV linked data as shown in the screenshot below. From there it is possible to check that all the CSV datapoints are routed from the correct Source Address (here %mbus:1/0, %mbus:2/0, %mbus:3/0, ...).
¶ 1.3 Generated CSV files
New CSV files are periodically created according to the File Cron parameter (here 0 0 * * *, which translates to every day at midnight). The files are stored locally either on the disk, external USB, or other storage options (see File Storage parameter). Once created, those files appear in the CSV driver as addresses starting with the prefix %csv_file/. The number of files stored locally is limited by the parameter File Max Number (here 365 files, with one file generated per day). Those CSV file addresses can be selected (one or multiple) and then with the context menu (right click), it is easy to download the selected file(s) directly from the web interface. Note that it is also an option to activate a FTP server (FTP Server parameter), then connect with any FTP client (such as FilleZilla) to the universal IoT gateway, and download the CSV files from there. Also some EMS (Energy Management System) softwares can be configured to automatically retrieve from this FTP server the generated CSV files.
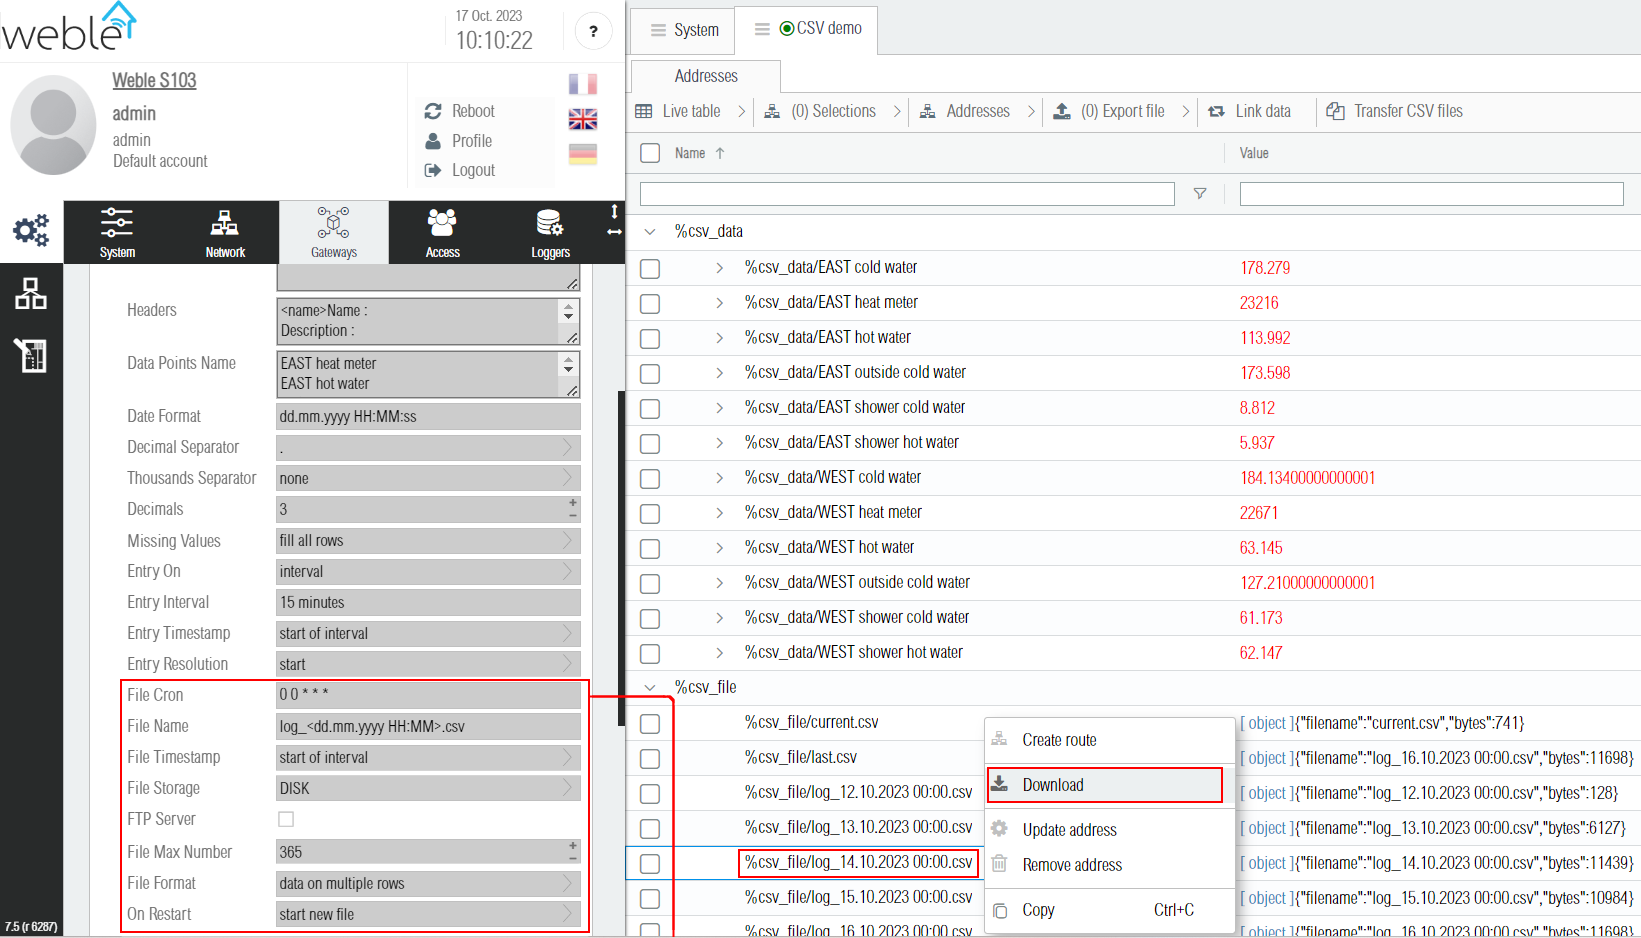
There is two main formats for CSV files (File Format gateway parameter)
- Data by columns : Each data point has its own column, and each new entry timestamp (here every 15 minutes) has a single row. Example of a file genereated with this format: log_14.10.2023_00_00.csv.
- Data on multiple rows : At each new timestamp (here every 15 minutes), up to n rows are created, where n is the number of data points logged. Each row usually contains the timestamp, the name of the data point, and the value of the data point. Example of a file genereated with this format: log_19.10.2023_00_00.csv.
¶ 1.4 Export to FTP / SMTP drivers
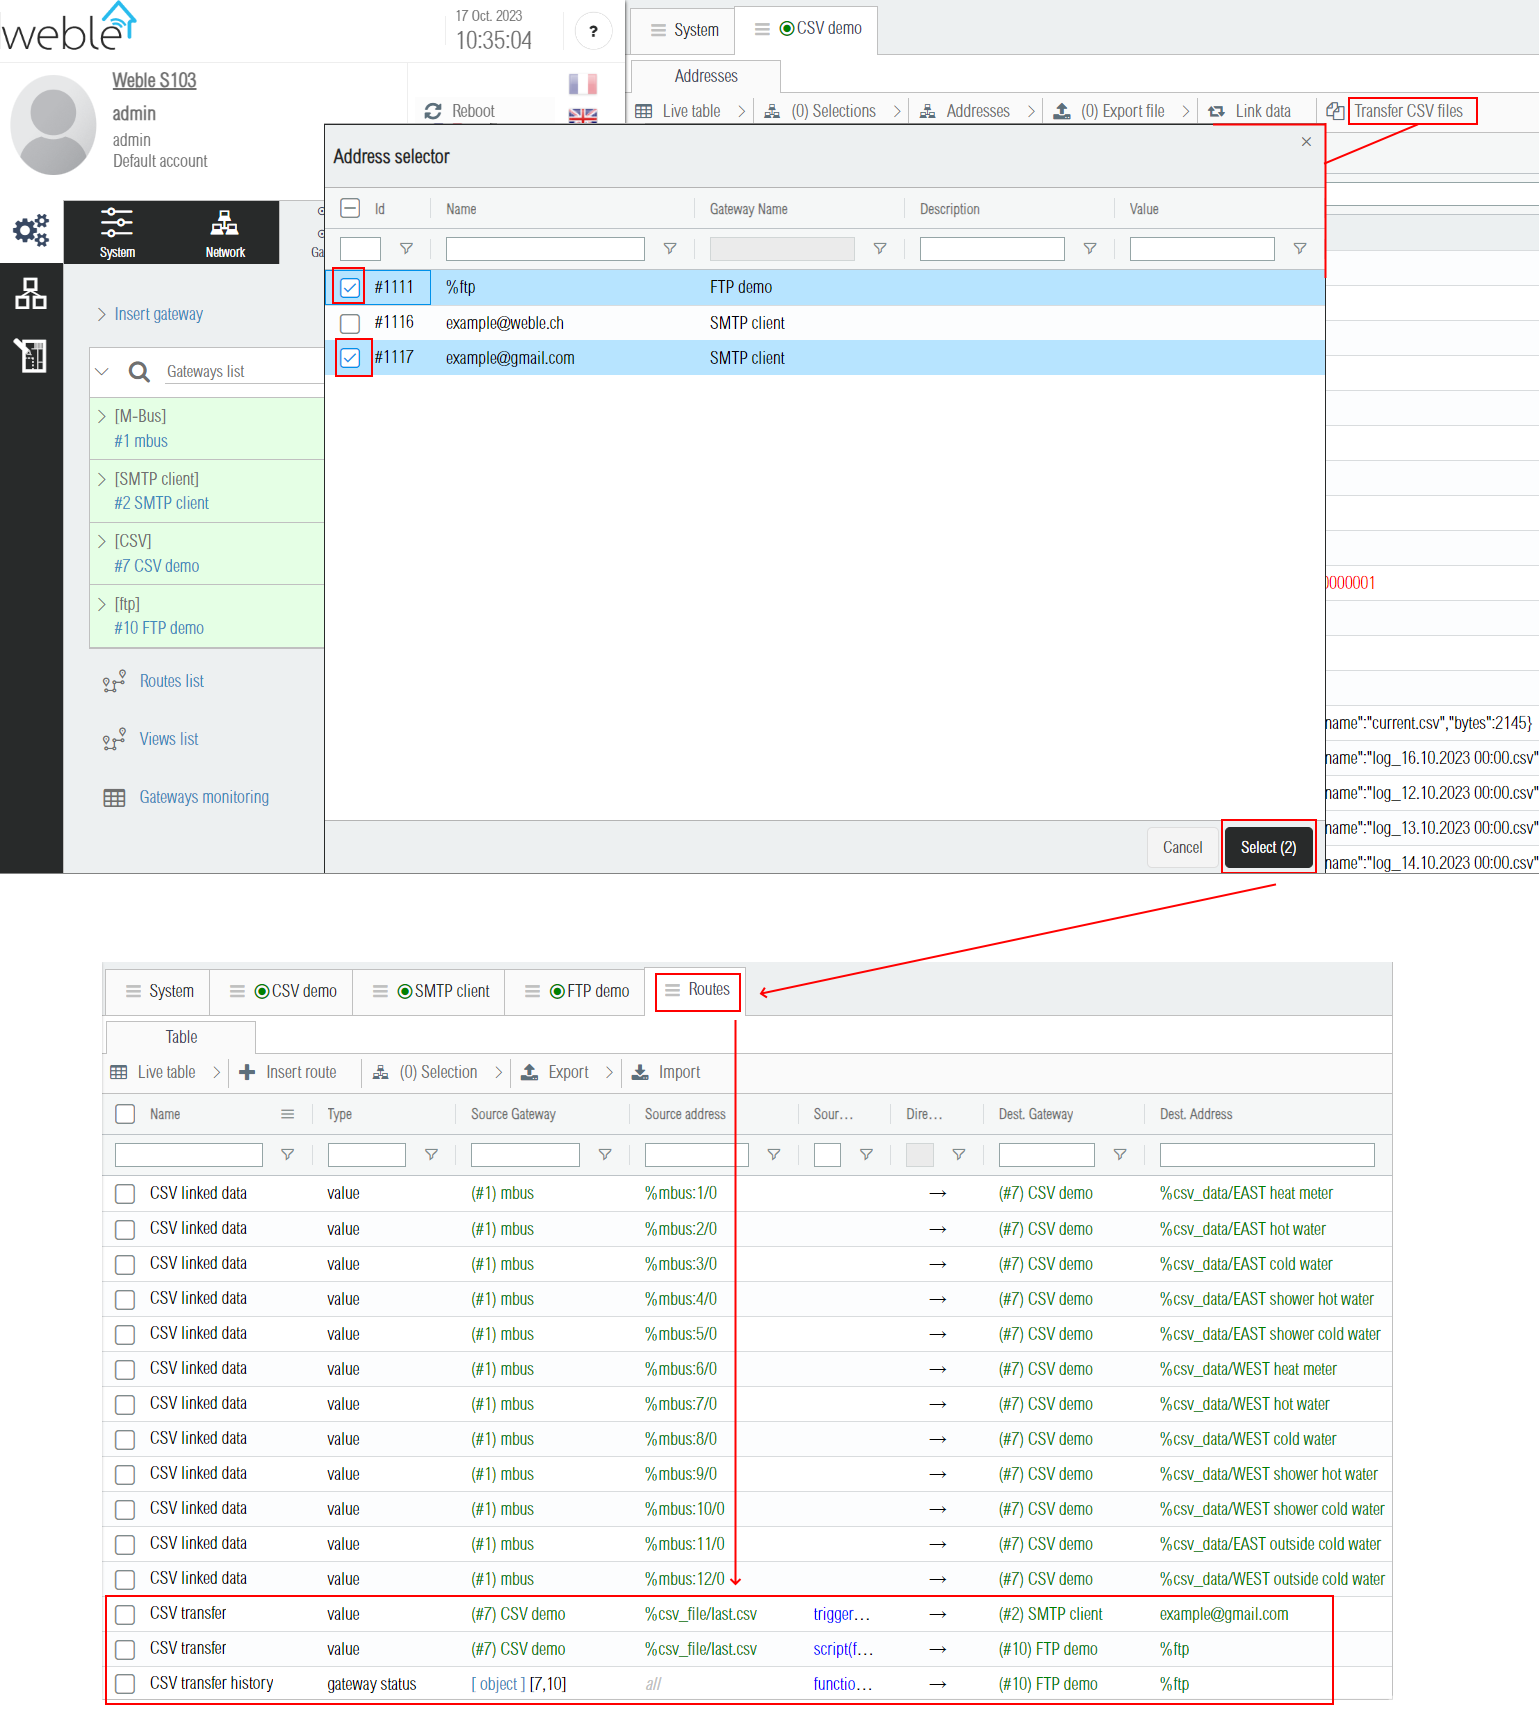
The CSV files can be uploaded through the FTP client driver and by email through the SMTP client by clicking the Transfer CSV files button. Once the Address selector popup opens, destination addresses can be selected. (here %ftp is the base of the targeted FTP directory, but subfolders could also be selected if priorly inserted inside the FTP driver).
After confirming the destination addresses selection, the corresponding routes are automatically created. CSV files are sent over ftp / email when the current file is finished and a new empty file is started (in this example a new completed file is sent every day at midnight according to the File Cron parameter 0 0 * * *).
Note that the two routes created for the FTP file transfers incorporate advanced mechanisms to guarentee that the files are successfully uploaded. If one transfer fails due to issues with the FTP server, the file is retransmitted after few minutes until the operation succeed.
¶ 2. Gateway parameters
The CSV gateway has many parameters that can be used to tune the creation of the CSV files. Many things can be configured such as the date formats, the time at which new entries are created, the time at which new files are created, the way the data points are sampled and the methods used to determine their value, the way the local CSV files are stored, and so on. It is a truly versatile driver that delivers an interoperable solid solution for logging and data export.
¶ 2.1 Table of the gateway parameters
| Label | JSON Key | Description |
|---|---|---|
| CSV Separator | separator | CSV file columns separator. Common separators are semicolon (;), comma (,), and the tabulation (\t). |
| Global Header | header | Fixed text header added at the beginning of the CSV file. Can contain the software version tag: <version> |
| Headers | headers | Ordered list of headers separated by a new line. The <name>, <data>, <time>, and <DST> tags can be prefixed to indicate a special type of header. The <name> type is used to display the name of data points, <time> type is the date (timestamp) of each new row, and the <data> type represents the data points numerical values. The <DST> tag refers to Daylight Saving Time and can be configured to <DST=1,0> to take the value 1 during the summer time and take the value 0 during the winter time. Headers without specified tags (such as Unit and Description) are purely informational and their value can be configured manually from the addresses. |
| Data Points Name | points | Ordered list of data point names. These names are used to automatically add the data point CSV addresses. These names are the values of the <name> header. |
| Data Format | dateFormat | Date format of each data sample. Available formats are documented in this github page: dateformat. |
| Decimal Separator | decimalSeparator | A decimal separator is a symbol (. or ,) used to separate the integer part from the fractional part of a number. |
| Thousands Separator | decimalSeparator | Separator used for the thousands of the integer part (groups of 3 digits). Possible values are none,space,.,,, or '. |
| Decimals | decimals | Fixes the number of decimals. If the value is negative (such as -1), it doesn't apply and the default Javascript number representation is used instead. |
| Missing Values | allowEmpty | If there are no new samples for a data point during the sampling interval, specifies whether its value in the CSV file row must be kept empty or filled with the last known value. If there is no last known value, i.e. if it is equal to null, then 0 is used to fill the missing value unless the parameter ends with except nulls. The possible values for this parameter are fill all rows,fill all rows except nulls,fill first row,fill first row except nulls, and keep empty. |
| Entry On | entry | Specifies the type of sampling intervals used for creating new entries (rows) in the CSV file. The type interval is used to define a fixed recurring interval in milliseconds. With type cron the start and end of the intervals are defined by the cron (crontab.guru). The type change of value is used to create a new entry line in the CSV file whenever a data point value changes, which can lead to the creation of voluminous CSV files. |
| Entry Interval | entryInterval | Creates a new entry in the CSV file every x milliseconds. By default it is set to 15 minutes. This parameter only applies if the parameter Entry On is configured to type interval. |
| Entry Interval | entryInterval | Creates a new entry in the CSV file every x milliseconds. By default it is set to 15 minutes. This parameter only applies if the parameter Entry On is configured to type interval. |
| Entry Cron | entryCron | Cron which determines when the new measurement interval starts (crontab.guru). This parameter only applies if the parameter Entry On is configured to type cron. |
| Entry Timestamp | entryTimestamp | Specifies whether the date of each new line in the CSV file is based on the start of interval, middle of interval, or end of interval of the current sampling interval. |
| Entry Resolution | entryResolution | Calculation method used to calculate the value of data points over the interval. Possible values are start (value at the start of the interval), end (value at the end of the interval), cron (value at a specific time during the interval), temporal average (average weighted by the duration of each value), active time percentage (percentage of time during which the value is not equal to 0), active seconds (number of seconds during which the value is not equal to 0), first sample (the first sample taken during the interval), last sample (the last sample taken during the interval), min sample (the minimum among the samples taken during the interval), max sample (the maximum among the samples taken during the interval), sample average (the arithmetic average of the samples taken during the interval), sample count (the number of samples taken during the interval), and custom multi (a JSON combination of multiple resolutions methods). The options containing the sample keyword are based only on the samples of the data taken during the interval. The options not containing the sample keyword are partly independent of the frequency and the number of readings, because those are computed based on the curve of the values with respect to the time axis. |
| Entry Resolution Cron | entryResolutionCron | Only applies if the parameter Entry Resolution is set to cron. Cron which determines when to take the value for the current sampling interval (value at a precise time). |
| Custom Resolution | entryResolutionCustom | Only applies if the parameter Entry Resolution is set to custom multi. This field is used to get multiple measurements / resolutions per data point. It contains a JSON object where the key is the data point name suffix and the value the measurement method (one of the methods defined in the Entry Resolution parameter). Example: {"_avg":"temporal average","_active":"active seconds","_count":"sample count"} |
| File Cron | exportCron | Cron used to determine the creation of new CSV files. If the cron is 0 0 * * * a new CSV file is created every day at midnight. |
| File Name | filename | Specifies the name of the new file when it is created. The name can be dynamic and contain a date such as <dd.mm.yyyy hh:MM:ss>, or a simple counter using the <i> tag. |
| File Timestamp | fileTimestamp | If the file name contains a date, specifies whether the date of each new CSV file is based on the start, middle, or end of the file's recording interval. |
| File Storage | localStorage | Specifies the medium on which local files are saved: RAM, DISK, USB disk, or an SMB2 drive. |
| FTP Server | ftpServer | Only applies if the parameter File Storage is set to DISK or USB. Activates an FTP server, in order to make files accessible from the LAN or from the Weble remote access cloud. |
| FTP Server Port | ftpServerPort | Only applies if the parameter FTP Server is activated. FTP server network port (usually 21). |
| FTP Server User | ftpServerUser | Only applies if the parameter FTP Server is activated. Username to login on the FTP server (optional). If the username starts with a forward slash symbol /, then it gives access to the CSV files of all CSV gateways on the device. It is also possible to define multiple users by separating their names with a comma ,. |
| FTP Server Password | ftpServerPassword | Only applies if the parameter FTP Server is activated. Password to login on the FTP server (optional). If there are several users, their respective passwords must be separated by a comma ,. |
| SMB2 Share | smb2Share | Only applies if the parameter File Storage is set to SMB2. The shared repository path used to store the generated CSV files. Example: \\172.16.1.8\export. |
| SMB2 Domain | smb2Domain | Only applies if the parameter File Storage is set to SMB2. The domain where the user is registered. May be empty. |
| SMB2 Username | smb2Username | Only applies if the parameter File Storage is set to SMB2. The username of the user that access the share. |
| SMB2 Password | smb2Password | Only applies if the parameter File Storage is set to SMB2. The user password |
| File Max Number | localFilesMax | Maximum number of files kept locally. |
| File Format | exportFormat | Determines the format of the CSV file. Either the values at each interval are recorded in several columns of a single line (data by columns), or in several lines (each line having its own single data point) created at each new measurement interval (data on multiple rows). |
| On Restart | onRestart | Defines how the driver treats the current file when it restarts (in case of crash / manual reboot). With option start new file it overwrites the current file and creates a new one (data loss). With option append with headers it keeps the current file, writes again the headers, and continues writing after it. With option append without headers it keeps the current file and continues writing as if nothing happenened. |
¶ 2.2 Example of a CSV gateway json
{
    "name": "CSV demo",
    "driver": "exportCSV",
    "description": "CSV driver used for demo purposes.",
    "active": 1,
    "json": {
        "separator": ";",
        "header": "",
        "headers": "<name>Name :\nDescription :\nUnit :\n<time>Timestamp:",
        "points": "EAST heat meter\nEAST hot water\nEAST cold water\nEAST shower hot water\nEAST shower cold water\nWEST heat meter\nWEST hot water\nWEST cold water\nWEST shower hot water\nWEST shower cold water\nEAST outside cold water\nWEST outside cold water",
        "dateFormat": "dd.mm.yyyy HH:MM:ss",
        "decimalSeparator": ".",
        "thousandsSeparator": "none",
        "decimals": 3,
        "allowEmpty": "fill all rows",
        "entry": "interval",
        "entryInterval": 900000,
        "entryCron": "",
        "entryTimestamp": "start of interval",
        "entryResolution": "start",
        "entryResolutionCron": "*/15 * * * *",
        "entryResolutionCustom": "{\n\t\"_avg\" : \"temporal average\",\n\t\"_active\" : \"active seconds\",\n\t\"_count\" : \"count\"\n}",
        "exportCron": "0 0 * * *",
        "filename": "log_<dd.mm.yyyy HH:MM>.csv",
        "fileTimestamp": "start of interval",
        "localStorage": "DISK",
        "ftpServer": false,
        "ftpServerPort": 21,
        "ftpServerUser": "",
        "ftpServerPassword": "",
        "smb2Share": "",
        "smb2Domain": "",
        "smb2Username": "",
        "smb2Password": "",
        "localFilesMax": 365,
        "exportFormat": "data on multiple rows",
        "onRestart": "start new file"
    }
}
¶ 3. Addresses parameters
CSV addresses do not have any custom parameters. Their name structure holds all the important information. There is two types of addresses :
- data points, which are starting with the
%csv_data/prefix. - csv files, which are starting with the
%csv_file/prefix.
Each csv data point address has a main address following this template %csv_data/[NAME OF THE DATA POINT] and children addresses for each CSV headers following this template %csv_data/[NAME OF THE DATA POINT]/[NAME OF THE CSV HEADER]. The data points addresses are automatically generated when the driver starts based on the Data Points Name gateway parameter. The driver receives a new data sample each time one of its main data point addresses is written with a new value. So the sampling per say is managed in the routes and in the configuration of the other drivers (M-Bus, Modbus, Bacnet, and so on). For some advanced use cases the logic module can also be used to feed your CSV driver with data.
Each csv file address has the following structure %csv_file/[NAME OF THE FILE]. Files are added once they are fully terminated. Additionally there is 2 special file addresses:
%csv_file/current.csvrefers to the CSV file being currently prepared. This file is not complete, its content is updated periodically at each new data entry timestamp. The new lines are appended to the current.csv file one by one.%csv_file/last.csvrefers the the last completed csv file. This address is used to export the newly completed CSV files to FTP clients or SMTP clients (as an attached file in the email).
From the web interface.csv files addresses can be selected and with the context menu (right-click) it is possible to download one (as .csv file) or multiple files (as a .zip file). Note that it is also possible to download programmatically the local CSV files from the HTTP API. If the gateway parameter FTP Server is activated, then the local files are also availaible for download through any FTP clients.